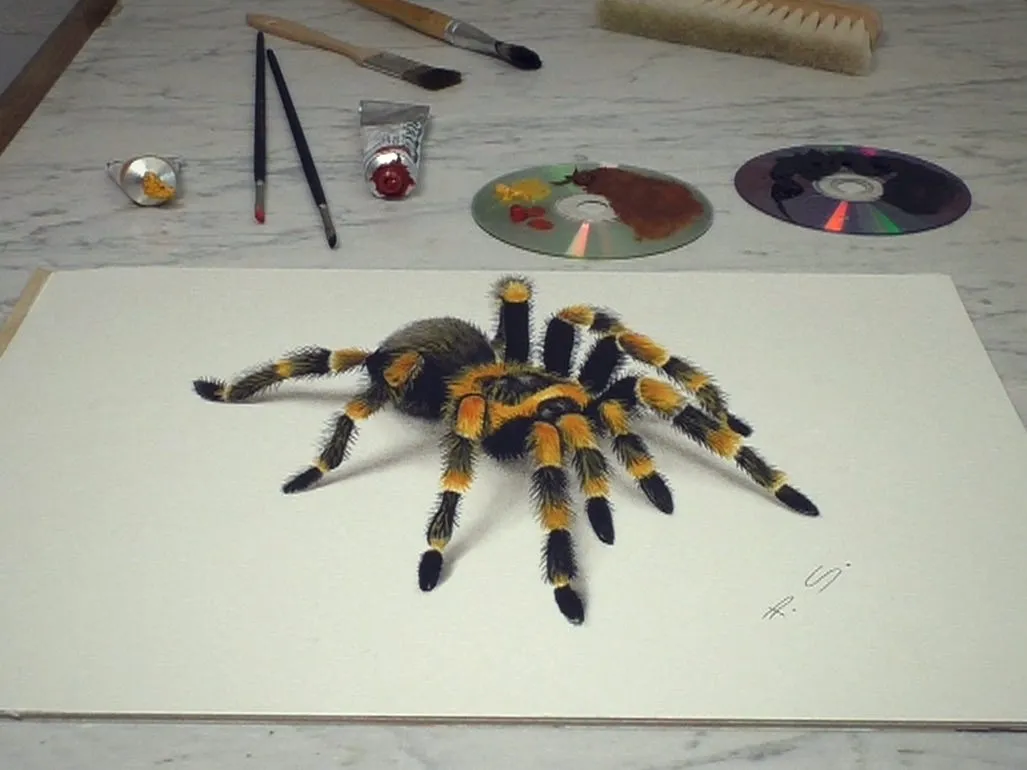
What You’ll Need to Draw a 3D Tarantula
Embarking on the journey of drawing a 3D tarantula can be a rewarding experience. Before you begin, gather your essential supplies. The right tools will not only make the process easier but also enhance the final outcome of your artwork. This guide will provide you with the necessary steps, starting with the materials.
Pencils for 3D Tarantula Drawing
For drawing a 3D tarantula, using different pencils with varying grades of hardness is crucial. You’ll want to have a range from softer pencils (like 2B, 4B, or 6B) for shading and creating darker tones to harder pencils (like HB or 2H) for initial sketching and outlining. The softer pencils are excellent for creating depth and shadow, while the harder ones allow for precise lines and details. Having a set of pencils with these different grades will give you more control over the shading and depth of your drawing. Consider a mechanical pencil for detailed areas.
Paper and Erasers for 3D Drawing

Choosing the right paper and erasers is as important as selecting the pencils. Opt for paper that is specifically designed for drawing, as it offers a good surface for pencil marks and erases cleanly. A sketchbook or drawing pad with medium-weight paper (around 90-100 gsm) is a good choice. For erasers, both kneaded erasers and regular erasers are useful. A kneaded eraser can be molded into different shapes for precise erasing and for lifting highlights, while a regular eraser is good for general erasing and cleaning up lines. Make sure to also have a sharpener to keep your pencils ready for detail.
Step 1 Sketching the Tarantula’s Body
Begin your 3D tarantula drawing by sketching the basic body shapes. Lightly sketch the main body and the cephalothorax (the combined head and thorax). Remember, the key to 3D drawing is to create the illusion of depth, so use your pencils to lightly outline the form, keeping in mind how the different parts will overlap and cast shadows. Don’t press too hard at this stage; these are just guidelines for your final artwork. The aim here is to get the basic proportions and placements correct.
Creating the Body Shape
The body of the tarantula is typically oval or slightly rounded. Start by sketching an oval shape for the abdomen, which is the larger part of the body. Use light lines to create the outline. Next, draw a slightly smaller, more rounded shape for the cephalothorax. Position this shape near the top of the oval, leaving space for the connection point. Remember that these are the base shapes and do not need to be perfect, as you will refine them in later steps. The accuracy here will define the final shape of your tarantula.
Adding the Cephalothorax

The cephalothorax, or the head region, is an essential element of the tarantula. It is the location where the legs and eyes are attached. Sketch the cephalothorax as a rounded, slightly boxy shape connected to the abdomen. Ensure that the size and shape of the cephalothorax are proportional to the abdomen. Lightly sketch in the areas where the eyes will be and where the legs will connect. These initial guides will assist you in positioning the other details. The initial sketch will help you get the overall feel and make it look realistic.
Step 2 Drawing the Legs
Now comes the exciting part — drawing the legs! Tarantulas have eight legs, and the way you position and detail them will significantly impact the 3D effect. Remember that the legs are not all in the same plane. Some will appear closer, while others will recede into the background. This overlapping and varying perspective are what bring the 3D effect to life.
Positioning the Legs
Start by sketching the general direction and position of the legs. Draw the legs in pairs on each side of the body. Some legs will be more forward, some sideways, and some backward. Use light, curved lines to depict the shape of each leg, and vary the leg positions to create the impression of depth. Some legs will overlap others, which is crucial for a 3D effect. Don’t make the lines too dark at this stage; you want to have the option to refine the leg positions as you add details.
Adding Details to the Legs

Once you are satisfied with the basic leg positions, start adding details. Tarantula legs are segmented, so sketch the segments using slightly curved lines. Pay attention to the way each segment bends and curves. Some segments will cast shadows on others, and this will contribute to the 3D look. Lightly shade the underside of the legs to create depth. Remember, details like these are what help make the drawing realistic and bring it to life. The key is to observe the position of each leg and make the drawing look as natural as possible.
Step 3 Detailing the Tarantula
With the basic structure in place, it’s time to add details that will make your tarantula drawing stand out. Adding features like hair, texture, eyes, and fangs brings realism to the artwork. The details also play a crucial role in enhancing the 3D effect.
Adding Hair and Texture
Tarantulas are known for their hairy appearance. To create this, add short, fine strokes all over the body and legs. Vary the length and direction of the strokes to create texture. For areas that appear closer to the viewer, make the strokes darker and more pronounced. For areas farther away, make them lighter. You can also use the eraser to create highlights on the hairs, making them appear more three-dimensional and capturing the effect of light. The overall effect is that of a more realistic, furry tarantula.
Creating the Eyes and Fangs

Tarantulas have multiple eyes, usually arranged in a cluster. Sketch small, dark circles for the eyes on the cephalothorax. Add small highlights to each eye to give them a reflective quality. Next, draw the fangs. These are typically located near the mouth. Draw two curved, pointed shapes, and make them slightly darker than the surrounding areas. The eyes and fangs are essential parts of the face. They will give your tarantula drawing an air of realism and make it more interesting.
Step 4 Shading for 3D Effect
Shading is a critical technique to give your tarantula a 3D effect. By understanding light and shadow, and applying shading techniques, you can make the drawing appear more three-dimensional. This is what makes the tarantula appear as if it is popping off the page.
Understanding Light and Shadow
Before you start shading, think about the light source. Decide where the light is coming from. This will determine where the shadows will fall. Generally, the areas facing the light source will be lighter, and the areas away from the light source will be darker. The key is to create contrast between light and shadow to suggest volume and depth. Practice different lighting angles and determine which one is best to enhance the 3D effect of your drawing.
Applying Shading Techniques

Begin shading with a light touch. Start by shading the areas that are furthest away from the light source. Use the side of your pencil to create smooth gradients. Build up the shadows gradually. For areas that need to be darker, layer more pencil marks. Use your finger, a blending stump, or a paper towel to smooth out the shading and blend the tones. Remember to vary the intensity of the shadows and highlights to create the most impact. Use the eraser to refine edges and create highlights.
Step 5 Refining and Finishing Touches
Once you have completed the shading, it’s time to make the final refinements and touches. Take another look at your drawing, assess the overall effect, and make any adjustments necessary. These details will help to ensure the best outcome of the drawing.
Adding Background and Final Details
Consider adding a background to make the drawing more complete. You could sketch a simple ground or habitat for the tarantula. Add a few final details, such as slight variations in texture or tiny highlights, to make the drawing stand out even further. Use a sharp pencil to emphasize some of the details and edges. Stand back and admire your work. The goal is not only to accurately depict a tarantula but also to capture the essence of its form, texture, and character. With these steps, you’ve now learned how to draw a 3D tarantula.