Tevo Tarantula First Print Guide for Beginners
Embarking on your 3D printing journey with the Tevo Tarantula can be an exciting experience. This guide is designed to help beginners achieve a successful first print, walking you through each step from unboxing to troubleshooting. The Tevo Tarantula is a popular and affordable 3D printer, ideal for those looking to explore the world of additive manufacturing. With a bit of patience and this comprehensive guide, you’ll be well on your way to creating fantastic 3D-printed objects. Remember to take your time, read instructions carefully, and don’t be afraid to experiment. Enjoy the process of learning and creating; 3D printing is all about innovation and pushing boundaries. This guide provides detailed instructions to get you started and ensures that the process is as smooth as possible, setting a solid foundation for your 3D printing journey.
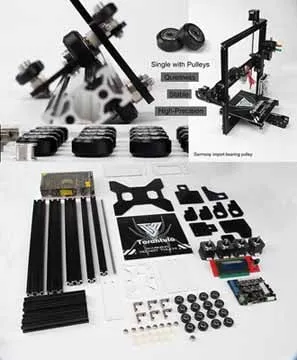
Unboxing and Assembly
The first step is to unbox your Tevo Tarantula and get everything ready. Carefully unpack all the components, ensuring you have all the parts listed in the manual. This initial stage sets the tone for the entire process, so it’s important to be thorough and organized. The Tevo Tarantula is usually delivered in a well-packaged box to protect all the components during transit. Take photos of the unboxing process in case any parts are missing or damaged; this will be helpful for warranty claims. Lay out all the pieces on a clean, well-lit surface to easily identify each part during the assembly process. Once everything is checked and ready, you can move on to the assembly phase, where you’ll start bringing your printer to life.
Checking the Package Contents

Before you start assembling, it is essential to check if all the parts listed in the manual are present. Tevo Tarantula often comes with various components, including frame parts, motors, electronics, screws, and tools. This step helps prevent any delays due to missing parts. Carefully compare the contents of the box with the packing list provided in the manual. If any parts are missing or damaged, contact the retailer or manufacturer immediately to arrange for replacements. Keeping a detailed inventory ensures a smooth assembly process and prevents any frustration later on. Laying out all the components in an organized manner is a good practice.
Assembling the Frame
The frame is the backbone of your Tevo Tarantula. Start by connecting the frame components, typically using screws and brackets. Follow the instructions in the manual carefully to ensure the frame is square and stable. A correctly assembled frame is crucial for print quality; an unstable frame may lead to vibrations, causing your prints to fail. Tighten all screws securely, but avoid over-tightening, which could strip the threads. The frame assembly usually involves attaching the vertical supports to the base, ensuring they are perpendicular to each other. Take your time to make sure everything is aligned correctly, and the frame forms a solid foundation. Proper frame construction is a cornerstone of successful 3D printing, so pay close attention to this step.
Connecting the Electronics
Next, you’ll connect the electronic components. This includes attaching the motors, endstops, heated bed, and control board. Refer to the manual for the correct wiring diagrams to avoid damaging any components. Pay close attention to the polarity of the connections to ensure the motors and other components function as intended. Use the correct connectors and ensure they are securely plugged into the corresponding ports on the control board. Cable management is crucial; use cable ties or clips to keep the wires organized and away from moving parts. A neat wiring setup not only enhances the printer’s aesthetics but also minimizes the risk of electrical shorts. Once the wiring is complete, double-check all connections before powering on the printer.
Bed Leveling

Bed leveling is one of the most critical steps for achieving a successful first print. A properly leveled bed ensures that the first layer of the print adheres correctly, which is fundamental for the entire print process. The Tevo Tarantula typically uses a manual bed leveling system, although some models may include auto-bed leveling. Ensure your bed is stable and does not wobble. Leveling the bed involves adjusting the height of the bed at different points to ensure it’s parallel to the nozzle’s movement. This ensures that the nozzle is the correct distance from the bed across the entire print area.
Manual Bed Leveling Procedure
Manual bed leveling requires you to use the adjustment knobs located under the print bed. You will need a piece of paper or a feeler gauge. Move the nozzle to each corner of the bed. Place the paper between the nozzle and the bed and adjust the corresponding knob until there is slight resistance when you pull the paper. Repeat this process for all corners until you achieve consistent resistance. The goal is to have the nozzle at a uniform distance from the bed across the entire print surface. Fine-tuning the bed leveling is crucial, as an incorrect level can lead to poor adhesion and print failures. This step may require several iterations to achieve the desired level of accuracy.
Using Auto Bed Leveling (If Applicable)
If your Tevo Tarantula has auto bed leveling (ABL), the process is much simpler. The ABL system uses a sensor to measure the distance between the nozzle and the bed at various points. You typically need to initialize the ABL system through the printer’s control panel. Once initialized, the printer will automatically compensate for any bed irregularities. The ABL system makes printing easier and more accurate, as it eliminates the need for manual adjustment. However, it is important to ensure that the sensor is calibrated correctly and that the bed surface is clean. ABL systems often require you to set the Z-offset, which is the distance between the nozzle and the bed. This setting is essential for the first layer adhesion.
Slicing Your First Model

Slicing is the process of converting your 3D model into instructions that the printer can understand. You’ll use slicing software to prepare your 3D model for printing by converting the digital design into a series of layers. This process generates the G-code, which is the language of your 3D printer. The software, or slicer, allows you to adjust settings like layer height, infill density, print speed, and temperature, directly impacting the print’s quality and strength. Understanding slicer settings is key to printing successfully. Some popular slicers like Cura and PrusaSlicer can be used with Tevo Tarantula; follow the manufacturer’s instructions to configure your printer profile within the chosen software.
Choosing a Slicer
There are several free and paid slicers available. Popular options include Cura, PrusaSlicer, and Simplify3D. Cura is a widely used, open-source slicer known for its user-friendly interface and extensive settings. PrusaSlicer is another excellent option, known for its high-quality slicing algorithms and advanced features. Simplify3D is a paid slicer that offers more advanced features and controls. Each slicer has its advantages and disadvantages. The best slicer for you depends on your needs and experience level. Experiment with different slicers to find the one that suits your workflow and provides the best results for your Tevo Tarantula.
Slicer Configuration for Tevo Tarantula
Configuring the slicer for your Tevo Tarantula involves setting up the printer profile, which includes the printer’s dimensions, nozzle size, and other specifications. This profile ensures that the slicer generates the correct G-code for your printer. You’ll also need to set up the print settings, such as layer height, infill density, print speed, and temperature. A good starting point for layer height is 0.2mm. The infill density affects the print’s strength and the time it takes to print. Experiment with different settings to optimize the print quality. Make sure to calibrate your temperatures for the filament you are using. Follow the guidelines provided by the filament manufacturer for optimal settings. Many online resources offer pre-configured profiles for Tevo Tarantula, which you can use as a starting point.
Selecting the Right Filament

The type of filament you choose significantly impacts the print quality and the ease of printing. PLA (Polylactic Acid) is a popular choice for beginners due to its low printing temperature and ease of use. It is also biodegradable. ABS (Acrylonitrile Butadiene Styrene) is another common filament that is stronger and more durable, but it requires a heated bed and can be more challenging to print. Other options include PETG, TPU (flexible filament), and various specialty filaments. Choose the filament based on your project’s needs. For your first print, start with PLA to familiarize yourself with the printing process. Refer to the filament manufacturer’s recommendations for the correct printing temperature and settings.
Preparing Your SD Card
Once you have sliced your model, the slicer will generate G-code, which you’ll save to an SD card. Insert the SD card into your computer and transfer the G-code file to the card. Ensure the SD card is properly formatted; FAT32 format is often recommended. Make sure the card is compatible with your printer. Older or damaged SD cards can cause printing problems. The SD card is used to transfer the print instructions from your computer to the printer. Remove the SD card safely from your computer after transferring the G-code. Be careful not to damage the card or the connector on the printer. Once the SD card is ready, you can insert it into your Tevo Tarantula to start printing.
Printing Your First Model
Now that you have everything set up, it’s time to print your first model. This section covers the essential steps required to start and monitor your print. Preparing your printer for printing is a critical step toward a successful outcome, which starts with preheating the nozzle and the bed. Ensure the bed is clean and the nozzle is ready to extrude filament.
Preheating the Nozzle and Bed

Before starting your print, preheat the nozzle and the heated bed to the appropriate temperatures for your filament. Check the filament manufacturer’s recommendations for the optimal temperature settings. For PLA, a nozzle temperature of 200-220°C and a bed temperature of 50-60°C are often recommended. For ABS, you’ll need higher temperatures. Use the printer’s control panel to set the desired temperatures. Allow the nozzle and bed to reach the target temperatures before proceeding to the next step. Preheating helps the filament melt properly, ensuring good adhesion to the bed and proper extrusion. Preheating also prepares the machine for the printing process, increasing the likelihood of a successful outcome.
Loading the Filament
Once the nozzle is preheated, load the filament. Insert the filament spool onto the filament holder and feed the filament into the extruder. The extruder will then pull the filament through the hot end. Some printers have a manual feed button. Make sure the filament extrudes smoothly from the nozzle. Adjust the filament tension if needed. The filament should extrude evenly without any clogging. If the filament is not extruding properly, check for blockages. Make sure the correct filament type is being used to avoid extrusion problems. Loading the filament correctly is essential for a smooth print. Ensure the extruder is working properly by visually inspecting the filament flow.
Starting the Print
Insert the SD card into your Tevo Tarantula, and navigate the menu to select the G-code file you want to print. Select the file and start the print. The printer will begin by homing (moving to its zero position) and starting the printing process. Watch for the first layer to be laid down, as it’s crucial for adhesion. The printer will now execute the G-code instructions, moving the print head and extruding the filament layer by layer. If everything is set up correctly, the printer should begin printing your 3D model. Observe the process closely to make sure everything is proceeding smoothly. The first layer will determine the final print outcome.
Monitoring the Print

While the print is in progress, monitor it closely for any issues. Check for bed adhesion problems, nozzle clogs, and any other irregularities. If the first layer does not stick to the bed, adjust the bed level or the first layer height. Keep a close eye on the initial layers, as any problems at this stage can ruin the entire print. Ensure the filament is extruding consistently and that the print head is moving smoothly. Watch for any warping or curling of the print, which could indicate bed temperature or adhesion problems. If you notice any issues, you might need to pause the print and troubleshoot. It’s essential to stay nearby during the first print to respond to any issues immediately.
Post-Print Steps
Once the print is finished, you will have to remove the printed object. This is usually a straightforward process. Once the print is complete and the bed has cooled, carefully remove the printed object. Handle the printed object with care; some parts may be fragile. Inspect the finished print for any defects. Review the process and consider what steps you would take in a future print to create a perfect model.
Removing the Print
Once the print is complete and the bed has cooled, carefully remove the printed object. Depending on the filament and bed adhesion, this might require the use of a spatula or other tools to gently pry the print from the bed. Be careful not to damage the print or the bed during removal. If the print is stuck, try heating the bed slightly to soften the filament and make removal easier. After removing the print, clean the bed surface for the next print. Examine the print for any defects. Assess what could be improved in the next print. Clean the build plate to prepare it for the next print job.
Troubleshooting Common Issues

Despite your best efforts, you might encounter issues during your first print. This section will help you identify and resolve the most common problems to improve your prints.
Bed Adhesion Problems
Poor bed adhesion is one of the most frequent issues encountered by beginners. To improve adhesion, ensure that the bed is level and clean. Try applying a thin layer of glue stick or hairspray to the bed surface. Increase the bed temperature slightly. Adjust the Z-offset to bring the nozzle closer to the bed. Other solutions include using a raft or brim in your slicer settings. Proper bed adhesion is critical for a successful print, and you should address this issue early. If the first layer doesn’t adhere, the rest of the print is likely to fail.
Nozzle Clogging
Nozzle clogs can occur due to various reasons, such as overheating the filament or using poor-quality filament. To resolve a clog, heat the nozzle to the maximum temperature for your filament type and try pushing the filament through manually. You can also use a cleaning needle to remove the clog. If clogs persist, consider replacing the nozzle. Prevent nozzle clogs by ensuring the filament is dry and the nozzle temperature is appropriate. Regular maintenance, such as cleaning the nozzle, will help ensure continuous printing. High-quality filament and correctly calibrated temperatures can reduce the likelihood of clogging.
Layer Shifting
Layer shifting occurs when the print head moves unexpectedly during printing, resulting in misaligned layers. Common causes include loose belts, insufficient motor current, or obstructions in the print path. Tighten the belts on your printer and ensure that the motor currents are properly calibrated. Inspect the print path for any obstructions that might be hindering the print head movement. Check the set screws on the pulley wheels. Check for any other mechanical problems that prevent smooth movement. Troubleshooting layer shifting requires a thorough inspection of all mechanical components.
Warping and Curling
Warping and curling occur when the edges of the print lift off the bed, often caused by uneven cooling or poor bed adhesion. To prevent warping and curling, ensure the bed is level and the bed temperature is appropriate. Use a brim in your slicer settings to increase the surface area contact between the print and the bed. Print in an enclosure to maintain a consistent temperature. Reduce the print speed for the first few layers. Proper bed adhesion and temperature control are essential for avoiding warping and curling. Using a brim is a good practice when dealing with warping issues.
Maintenance and Further Steps
Once you have successfully printed your first model, you can start exploring advanced techniques and further improving your prints. Regular maintenance will extend the life of your 3D printer and improve print quality. Proper maintenance and future exploration are key to a fulfilling 3D printing journey.