Understanding Tevo Tarantula Power Supply Wiring
Wiring your Tevo Tarantula 3D printer’s power supply correctly is crucial for both its functionality and your safety. This guide provides a comprehensive overview of the wiring process, with a focus on Australian electrical standards and best practices. A properly wired power supply ensures your printer receives the necessary power to operate efficiently, preventing potential damage to components and minimizing the risk of electrical hazards. This guide will help you navigate the sometimes confusing world of wiring, making the process easier and safer.
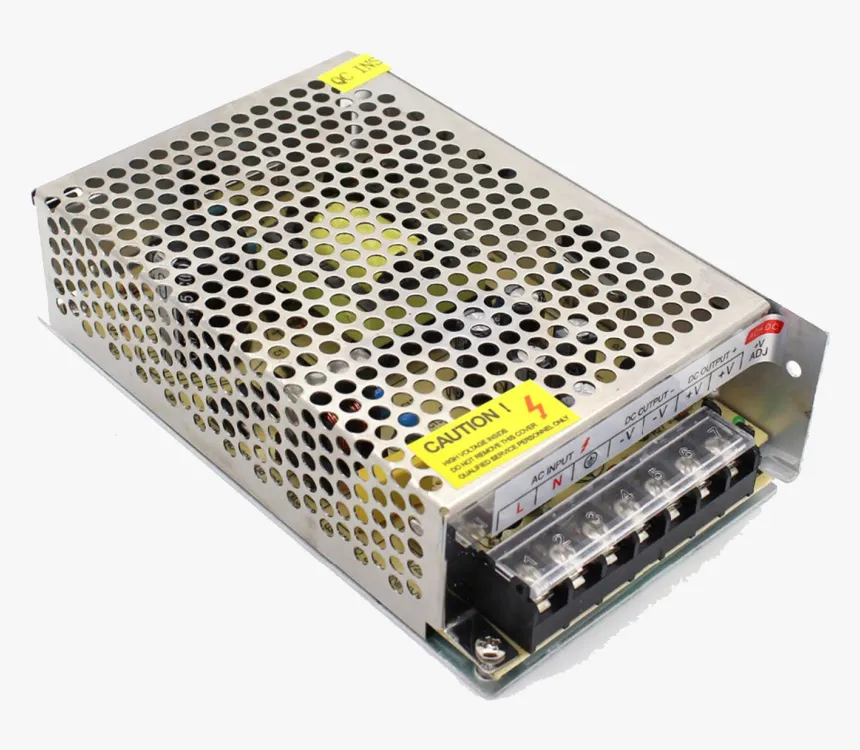
Power Supply Components
Before you start, familiarize yourself with the power supply components. The power supply typically has two main sections, the AC input side and the DC output side. The AC input side connects to the mains power, usually through a power cord. This side includes terminals for the active (live), neutral, and ground wires. The DC output side provides power to the various components of your 3D printer such as the heated bed, the hotend, the stepper motors, and the control board. This side usually has terminals labeled for different voltage outputs, most common are 12V and 24V. Knowing the components and their functions is the first step in safe and effective wiring. Also check the label for the power rating, to ensure you don’t exceed the power supply maximum.
AC Input Connections

The AC input connections are where the power supply receives its electricity from the mains. Always ensure the power supply is disconnected from the mains before working with these connections. The AC input terminals will be marked with L (Live/Active), N (Neutral), and a ground symbol (Earth/Ground). In Australia, the active wire is typically brown or red, the neutral wire is blue or black, and the ground wire is green and yellow. Use appropriate wire connectors, and securely tighten the terminals. Poor connections can cause overheating and potential fire hazards. Ensure all connections are insulated properly. A correctly wired AC input is vital for preventing electrical shocks and ensuring the power supply functions properly. Always double-check your work to ensure correct wiring before applying power. Make sure that the wire gauge is appropriate for the current rating of the power supply and your local electrical codes.
DC Output Connections
The DC output connections deliver power to the 3D printer’s components. These terminals are usually labeled with positive (+) and negative (-) symbols, as well as voltage ratings (e.g., 12V or 24V). Connect the corresponding wires from your printer’s components to these terminals. It is crucial to connect the positive and negative terminals correctly; reversing the polarity can damage your printer’s components. Use the appropriate wire gauge for each component. The heated bed and hotend often draw significant current, so use thicker wires. It is also recommended to use crimp connectors or screw terminals to ensure secure and reliable connections. Double-check all connections for tightness and correct polarity before powering on your printer. Consider labeling each wire, which simplifies future maintenance and troubleshooting.
Wiring Safety Precautions
Safety should be your top priority. Always disconnect the power supply from the mains before working on any wiring. Never work on live electrical circuits. Use appropriate tools, such as insulated screwdrivers and wire strippers. Wear safety glasses to protect your eyes. If you are not experienced with electrical work, consult a qualified electrician. Ensure all connections are secure and properly insulated to prevent short circuits. Keep the work area clean and free of clutter. Regularly inspect the wiring for any signs of wear or damage. If you notice any frayed wires or loose connections, address the issue immediately. By following these precautions, you can minimize the risk of electrical hazards and ensure a safe working environment.
Top 5 Wiring Tips for Your Tevo Tarantula

Tip 1 Confirm Voltage Selector
Many power supplies have a voltage selector switch (110V/220V). This switch must be set to the correct voltage for your region (220-240V in Australia). Failure to set the switch correctly can damage the power supply and potentially create a safety hazard. Carefully check the power supply label for the correct voltage setting. If the switch is set incorrectly, the power supply may not function correctly, or it may be permanently damaged. Double-check the voltage setting before connecting the power supply to the mains, and make sure it corresponds to your local voltage. If you are unsure, consult a qualified electrician.
Tip 2 Proper Wire Gauge
Using the correct wire gauge is critical for safety and performance. The wire gauge (thickness) should be appropriate for the current each component draws. For the heated bed and hotend, which draw significant current, use thicker wires (e.g., 16 AWG or thicker). For other components, such as the control board and stepper motors, thinner wires may suffice. Consult the printer’s manual or component specifications to determine the appropriate wire gauge. Using wires that are too thin can cause overheating, voltage drops, and potential fire hazards. Always ensure that the wires are securely connected to the terminals and that the insulation is intact. In Australia, electrical codes specify minimum wire sizes for different applications, and it is essential to adhere to these standards.
Tip 3 Secure Connections

Loose connections are a common cause of electrical problems and can lead to overheating and fire. Use crimp connectors or screw terminals to ensure secure connections. Make sure the wires are firmly inserted into the terminals, and tighten the screws properly. Periodically inspect all connections for tightness and any signs of corrosion or damage. If you notice any loose connections, disconnect the power and re-secure the wires. Consider using wire ferrules for stranded wires, especially when using screw terminals. This prevents stray wire strands from causing shorts. A properly secured connection is crucial for reliable and safe operation. Always double-check your work before applying power to your printer.
Tip 4 Use a Multimeter
A multimeter is an essential tool for wiring. Use it to verify the correct voltage outputs from the power supply and to check for continuity in your wiring. Before connecting any components, use the multimeter to check that the power supply is outputting the correct voltage (e.g., 12V or 24V). Use the continuity function to ensure that there are no short circuits. If you suspect a wiring issue, use the multimeter to trace the wires and identify the problem. The multimeter helps to ensure that all connections are made correctly and that there are no shorts or open circuits. The multimeter can also be used to test the polarity of the output wires, which prevents damage to sensitive components. Learning how to use a multimeter effectively is an essential skill for any 3D printing enthusiast.
Tip 5 Double-Check Polarity
Always double-check the polarity of the DC connections. Connecting the positive and negative terminals incorrectly can damage your printer’s components, such as the control board, the heated bed, and the hotend. Ensure that you connect the positive (+) wire to the positive terminal and the negative (-) wire to the negative terminal. Most components are labeled with polarity markings, or use a multimeter to determine which is positive and negative. Take a moment to carefully examine your connections before powering up your printer. If you are unsure about the polarity of a connection, it is best to seek help from someone more experienced. A simple mistake in polarity can lead to expensive repairs and downtime.
Australian Electrical Standards

When wiring your Tevo Tarantula in Australia, it’s critical to comply with Australian electrical standards. These standards ensure that electrical installations are safe and reliable. Always refer to AS/NZS 3000 (Wiring Rules) for the most up-to-date requirements. Ensure all wiring is carried out by a competent person. If you are not comfortable with electrical work, it’s best to consult a qualified electrician. Using compliant components and adhering to Australian standards is essential for ensuring your safety and complying with regulations. Non-compliance can result in fines or legal issues. Additionally, ensure that any modifications or additions to the electrical system comply with local regulations.
Safety Regulations in Australia
Australian safety regulations are designed to protect individuals from electrical hazards. Key regulations include the requirement for licensed electricians to perform certain types of electrical work. All electrical installations must be compliant with the current wiring rules. The use of approved components is mandatory. Always ensure that your wiring complies with all relevant safety regulations. Failure to comply with these regulations can have serious consequences, including electric shock, fire, and legal penalties. Stay informed of any updates to the regulations. If you’re unsure, consult with a qualified electrician or electrical inspector. Prioritize safety above all else to minimize the risk of electrical accidents.
Importance of Compliance
Compliance with Australian electrical standards is paramount for the safety of your 3D printer and your home. Compliance ensures that your printer is wired correctly and that all safety measures are in place to prevent electrical hazards. Non-compliance can result in serious risks, including electric shock, fire, and damage to your printer. Compliance also protects you from potential legal issues and insurance claims. Always prioritize safety and comply with all relevant Australian electrical standards. By adhering to these standards, you create a safe and reliable 3D printing setup. Regular inspection of your wiring and components, along with compliance with all relevant electrical standards, promotes a safe and reliable 3D printing experience.
Troubleshooting Common Wiring Issues

Even with careful wiring, issues can arise. This section addresses common problems and how to troubleshoot them. These issues can often be identified through visual inspection and the use of a multimeter. Remember to always disconnect the power before attempting to diagnose or repair any electrical issues. If you’re uncertain about any aspect of troubleshooting, seek help from an experienced technician. Properly diagnosing and resolving these issues keeps your printer running smoothly and prevents further problems.
Power Supply Not Turning On
If the power supply fails to turn on, first check the AC input connections. Ensure the power cord is properly connected and that the voltage selector switch is correctly set for your region. Use a multimeter to check the voltage at the AC input terminals. If there’s no voltage, there may be an issue with the power cord or the wall outlet. If the voltage is present, check the fuse on the power supply. If the fuse is blown, replace it with one of the correct rating. If the power supply still doesn’t turn on, there may be an internal fault, in which case, it is advisable to replace the power supply. Double-check your AC input wiring for any loose connections or shorts.
Extruder Not Heating
If the extruder (hotend) isn’t heating, check the DC output connections to the heated bed or hotend. Ensure that the correct voltage is being supplied to the heater cartridge. Use a multimeter to check the voltage at the hotend terminals. If there is voltage, the issue may be with the heater cartridge itself. Check the wiring and connections of the thermistor, as a faulty thermistor can prevent the extruder from heating. Ensure that the thermistor wires are properly connected and that the thermistor itself is functioning correctly. Inspect the connections between the power supply and the hotend for any loose connections or damage. A broken wire or a loose connection can prevent the hotend from reaching the correct temperature. Replace the hotend cartridge if needed.
Conclusion

Wiring your Tevo Tarantula power supply correctly is a fundamental part of setting up a reliable and safe 3D printer. By understanding the components, following safety precautions, and adhering to Australian electrical standards, you can avoid common wiring issues and ensure your printer operates effectively. Remember to double-check all connections, use the appropriate wire gauges, and always prioritize safety. If you’re ever unsure about any aspect of the wiring process, consult a qualified electrician. With proper wiring and diligent attention to detail, your Tevo Tarantula will provide many hours of successful 3D printing. By following the tips outlined in this guide, you can confidently tackle your Tevo Tarantula power supply wiring project in Australia and enjoy the rewarding experience of 3D printing.