What is the Tevo Tarantula Titan Extruder?
The Tevo Tarantula is a popular and affordable 3D printer, well-regarded within the hobbyist community. However, like many entry-level 3D printers, its original extruder setup can be a point of improvement. The Titan Extruder, developed by E3D, is a geared extruder designed to provide superior filament control, allowing for greater precision and reliability during 3D printing. This guide will take you step-by-step through the process of upgrading your Tevo Tarantula with a Titan Extruder, enhancing its performance and print quality. The Titan Extruder is known for its lightweight design, powerful grip on the filament, and its ability to handle a wide range of flexible filaments, making it a significant upgrade for your printer.
Benefits of Upgrading to a Titan Extruder
Upgrading the Tevo Tarantula with a Titan Extruder offers a variety of advantages. These improvements can lead to a more enjoyable and successful 3D printing experience, reducing frustration and improving the final results. The investment in a Titan Extruder can be justified by these gains, making it a valuable upgrade for any Tevo Tarantula owner looking to improve their printer’s capabilities and achieve higher-quality prints.
Improved Filament Control

The Titan Extruder’s geared design provides a much stronger grip on the filament, reducing the chances of slippage and ensuring a consistent flow of material to the hot end. This enhanced control is particularly beneficial when printing with flexible filaments, which can be difficult for standard extruders to handle. The precise control translates to better dimensional accuracy and more detailed prints.
Increased Printing Speed
The Titan Extruder can handle faster print speeds because of its direct-drive mechanism. This direct-drive design means the extruder motor is mounted directly above the hot end, minimizing the distance the filament has to travel. This setup reduces the likelihood of jams and enables faster retraction, allowing for quicker movements and, consequently, faster printing. This is a significant advantage for users who want to reduce print times.
Enhanced Print Quality
The combined benefits of improved filament control and increased printing speed result in higher print quality. Reduced stringing, more precise layer adhesion, and finer details are all achievable with the Titan Extruder. The consistent filament flow contributes to smoother surfaces and a more professional finish, enhancing the overall appearance of the printed objects. This upgrade is particularly noticeable in complex models and intricate designs.
Tools and Materials Needed

Before you begin, gather all the necessary tools and materials. This preparation will ensure a smooth and efficient installation process, minimizing downtime and maximizing the chances of a successful upgrade. Proper planning helps avoiding interruptions, frustration, and potential damage to your equipment. Make sure you have all the required items before starting.
- Tevo Tarantula 3D printer
- Titan Extruder kit (including extruder, motor, and mounting hardware)
- Screwdrivers (various sizes, Phillips head)
- Wrench set (metric)
- Allen wrenches (metric)
- Wire cutters and strippers
- Heat shrink tubing (optional, for wire connections)
- Multimeter (for checking electrical connections)
- Replacement screws (optional, in case some are lost or damaged)
Step-by-Step Installation Guide
This section provides a detailed, step-by-step guide to installing the Titan Extruder on your Tevo Tarantula. Following these instructions carefully will ensure a successful upgrade, allowing you to enjoy the benefits of enhanced printing performance. Take your time, double-check each step, and consult the included images for visual guidance. If you are uncomfortable with any step, consider seeking assistance from an experienced user or online resources.
Disassembling the Existing Extruder
Begin by disconnecting the power to your Tevo Tarantula and removing the existing extruder. Carefully detach any wires connected to the extruder motor and the hot end. Remove the extruder from its mounting position, taking note of how the components are assembled. It’s helpful to take photos of each step during the disassembly process for later reference during reassembly. This will help you remember how everything fits together. Keep the original screws in a safe place for later use.
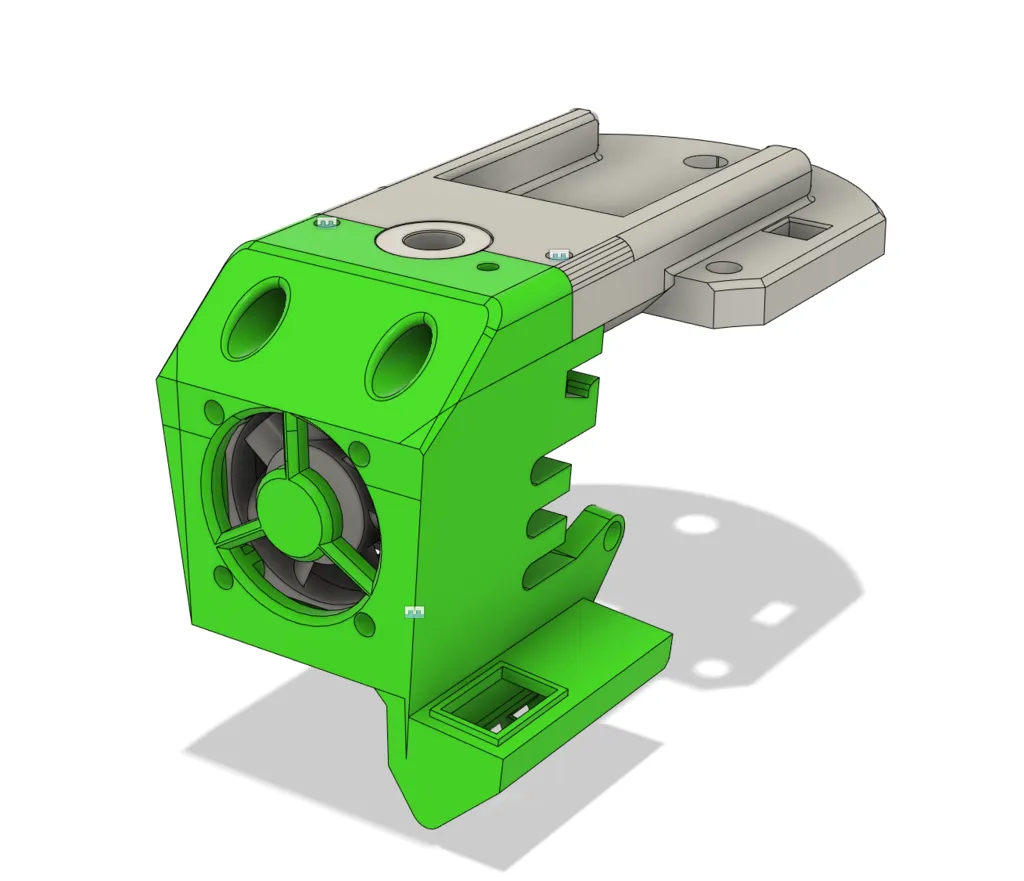
Mounting the Titan Extruder

Attach the Titan Extruder to the printer’s carriage using the provided mounting hardware. Ensure the extruder is securely fastened and properly aligned with the hot end. The specific mounting procedure may vary slightly depending on your Tevo Tarantula model, so consult the Titan Extruder’s instructions or online resources if necessary. Make sure the extruder is level and doesn’t interfere with the movement of the print head.
Connecting the Stepper Motor
Attach the stepper motor to the Titan Extruder. Securely fasten the motor, ensuring it is correctly aligned. Then, connect the motor’s wires to the appropriate terminals on the printer’s mainboard. Double-check all connections to ensure they are secure and properly seated. Improper connections can cause the extruder motor to malfunction. Refer to the printer’s wiring diagram if you’re unsure about the correct connections. It’s a good idea to test the motor before completing the entire installation.
Wiring the Extruder
Carefully connect the wiring for the extruder to the printer’s control board. Follow the wiring diagram specific to your Tevo Tarantula model. If you are unsure, consult the printer’s manual or online resources. Use heat shrink tubing to insulate any exposed wire connections to prevent shorts. Double-check all connections before powering on the printer.
Adjusting Extruder Settings

After the physical installation is complete, you will need to adjust the printer’s firmware settings to accommodate the new Titan Extruder. The key adjustments involve calibrating the E-steps and fine-tuning retraction settings to optimize performance. This process ensures that the extruder delivers the correct amount of filament. Accurate calibration is vital for achieving high-quality prints, and taking the time to get these settings right will significantly improve the results.
Calibrating the E-Steps
E-steps (steps per millimeter) control how much filament the extruder motor pushes through the hot end. Incorrect E-step settings will result in under-extrusion or over-extrusion, affecting print quality. To calibrate, you’ll need to measure how much filament is extruded for a given command. The calibration process involves marking the filament, extruding a specific length, measuring the actual length extruded, and adjusting the E-step value in the printer’s firmware. Consult online guides or videos specific to your printer’s firmware for detailed instructions on the calibration process. Precise E-step calibration is essential for achieving accurate and consistent prints.
Adjusting the Retraction Settings
Retraction settings are crucial for preventing stringing and oozing. Retraction refers to the process of pulling the filament back into the nozzle when the print head moves. The Titan Extruder often requires different retraction settings compared to the original extruder. Experiment with retraction distance and speed in your slicer software. Start with the recommended settings for the Titan Extruder and adjust them based on your prints. Fine-tuning these settings can significantly reduce stringing, improve print quality, and give you better results.
Troubleshooting Common Issues

Even with careful installation and calibration, you may encounter issues. Knowing how to troubleshoot common problems can save you time and frustration. Many of these issues are easily resolved with a bit of patience and the right knowledge. Often, issues relate to incorrect settings or physical problems. Here are some common issues you might face after installing the Titan Extruder.
Filament Not Feeding Properly
If the filament isn’t feeding, check for clogs in the nozzle or hot end. Make sure the filament is properly loaded and that the extruder is gripping the filament. Check the extruder tension. Ensure that the nozzle temperature is correct for the filament you are using. If the problem persists, disassemble the hot end and clean the nozzle.
Layer Shifting Problems
Layer shifting indicates a problem with the printer’s movement system. Check the belts for proper tension and ensure the stepper motors are functioning correctly. Verify that the set screws on the pulleys are tight. Ensure that the printer’s frame is stable and not moving during printing. Also, check the firmware settings related to acceleration and jerk, as incorrect settings can cause layer shifts.
Nozzle Clogging Solutions

Nozzle clogging is a common issue, especially with new extruders. Ensure the nozzle temperature is correct for the filament being used. Try cleaning the nozzle with a needle or performing a cold pull. Check for any debris or contaminants in the filament. Adjust the retraction settings to prevent filament from retracting too far and causing a clog. Consider using a nozzle cleaning kit to help remove any blockages.
Tips for Optimal Performance
To get the best performance from your Titan Extruder, consider these additional tips. Optimizing your print settings and maintaining your printer properly can significantly improve print quality and reliability. These tips involve settings adjustments and hardware maintenance to maximize performance and ensure your 3D prints turn out well. Following these guidelines will help you achieve more consistent, high-quality prints.
- Experiment with different print speeds and temperatures to find the optimal settings for your filament
- Ensure your printer bed is properly leveled for good first-layer adhesion
- Use quality filament to minimize issues
- Regularly check and tighten all screws and belts
- Keep your printer clean and free of dust
Maintaining Your Titan Extruder
Regular maintenance is essential for keeping your Titan Extruder in good working condition. Proper maintenance will extend the life of your extruder and help maintain consistent print quality. A little care and attention can go a long way in ensuring your printer runs smoothly and reliably, delivering high-quality prints consistently. This maintenance also prevents the breakdown of components, saving money and frustration in the long run.
Cleaning and Lubrication
Clean the extruder gears and nozzle regularly to remove any filament debris. Use a brush or compressed air to remove dust and particles. Lubricate the moving parts (such as the gears) with a small amount of appropriate lubricant to reduce friction and wear. Avoid over-lubricating, as this can attract dust and debris. Regularly cleaning and lubricating the moving parts is critical to their function.
Storage and Maintenance Schedule
When not in use, store your Titan Extruder in a clean, dry place. Establish a regular maintenance schedule, including cleaning, lubrication, and checking for loose screws. Regularly inspect the extruder for signs of wear and tear. By following a maintenance schedule, you can catch potential problems before they become serious. This proactive approach helps ensure the longevity and reliability of your Titan Extruder, allowing you to enjoy consistent high-quality prints over time.