Why Upgrade Your Tevo Tarantula Pro Kit
The Tevo Tarantula Pro is a popular 3D printer, known for its affordability and ease of use. However, like any entry-level machine, it can benefit significantly from upgrades. Upgrading your Tevo Tarantula Pro can unlock its full potential, leading to better print quality, faster printing speeds, and improved reliability. This guide will walk you through the various upgrade options and provide a step-by-step approach to enhance your 3D printing experience. By investing in an upgrade kit, you’re essentially future-proofing your printer, making it capable of handling more complex projects and higher-quality prints. Considering the relatively low cost of these upgrades compared to purchasing a new printer, it represents a smart investment for any 3D printing enthusiast.
Benefits of Upgrading Your 3D Printer
Upgrading your 3D printer offers a multitude of advantages that extend beyond just improving print quality. By carefully selecting and installing the right upgrade kit, you can transform your Tevo Tarantula Pro into a much more capable machine. These enhancements not only make the printing process more enjoyable but also open up new possibilities for the types of projects you can undertake. The cumulative effect of these upgrades often leads to a significant improvement in overall printing satisfaction and a reduction in the frustrations associated with lower-performing printers.
Improved Print Quality

One of the most noticeable benefits of upgrading your Tevo Tarantula Pro is the improvement in print quality. Upgrades such as a new hot end, nozzle, and extruder can significantly enhance the precision and detail of your prints. Better temperature control, more consistent filament extrusion, and reduced stringing are just a few of the improvements you can expect. This translates to smoother surfaces, sharper edges, and a more professional-looking final product. This is particularly crucial for those who require detailed prints or plan to produce functional parts where precision is paramount. (Image: improved-print-quality.webp)
Increased Print Speed
Certain upgrades can help to increase your printer’s speed. Upgrading your stepper motor drivers, for example, can allow for faster and smoother movements, leading to quicker print times without sacrificing quality. Faster printing speeds mean you can complete projects more quickly, allowing you to iterate and test designs more efficiently. This is especially important for those involved in prototyping or producing parts in large quantities. However, keep in mind that increasing print speed too much can sometimes negatively impact print quality; it’s essential to find a good balance.
Enhanced Reliability
Upgrading your Tevo Tarantula Pro can also enhance its reliability, reducing downtime and the need for frequent repairs. Installing a high-quality motherboard and upgrading the power supply can ensure more stable and consistent performance. This is particularly important for long prints or projects that require the printer to run continuously. Improved reliability leads to a more dependable printing experience, saving time and reducing frustration. Replacing worn-out components with more robust alternatives can also extend the overall lifespan of your printer, maximizing your investment.
Selecting the Right Tevo Tarantula Pro Upgrade Kit

Choosing the right upgrade kit is essential for a successful upgrade. The market offers a wide array of options, so it’s important to do your research and select upgrades that are compatible with your printer and meet your specific needs. Understanding your current printer’s limitations and identifying areas for improvement will help you choose the most effective upgrades. Considering factors like your budget, experience level, and the types of projects you typically undertake will help guide your decisions. Reading reviews and comparing the specifications of different kits is always good practice before making a purchase.
Considerations Before Upgrading
Before you begin upgrading your Tevo Tarantula Pro, there are several factors to consider to ensure a smooth and successful experience. Planning ahead can save you time and potential frustration down the road. These considerations range from budgetary constraints to the technical skills required for installation. Taking the time to carefully evaluate these factors will help you make informed decisions and avoid common pitfalls during the upgrade process.
Budget
Determine your budget before starting. Upgrade kits can range in price from a few dollars for simple components to several hundred dollars for more comprehensive upgrades. Consider how much you are willing to spend and prioritize upgrades based on their impact. It’s often best to start with smaller, more affordable upgrades and gradually expand your kit. This approach lets you spread the cost over time while improving your printer’s capabilities incrementally. Budgeting also helps you avoid overspending on unnecessary upgrades.
Experience Level

Assess your technical skills and experience level. Some upgrades, such as installing a new motherboard, require more advanced skills than others. If you are new to 3D printing or have limited experience with electronics, consider starting with simpler upgrades. If you feel uncomfortable with any aspect of the installation, consider seeking help from online communities or local experts. Safety is always a priority, and taking the time to familiarize yourself with the process before diving in is essential. Simple upgrades include replacing nozzles, the bed leveling or the hot end. More complex upgrades include electronics like motherboards or stepper drivers.
Upgrade Options for Your Tevo Tarantula Pro
There’s a wealth of upgrade options to enhance the capabilities of your Tevo Tarantula Pro. Each upgrade offers different benefits, so choose the ones that best align with your printing needs. These upgrades can be categorized into several key areas, each contributing to improved print quality, reliability, and speed. From the hot end to the electronics, each component plays an essential role in the overall performance of your 3D printer. By upgrading strategically, you can significantly improve your overall printing experience.
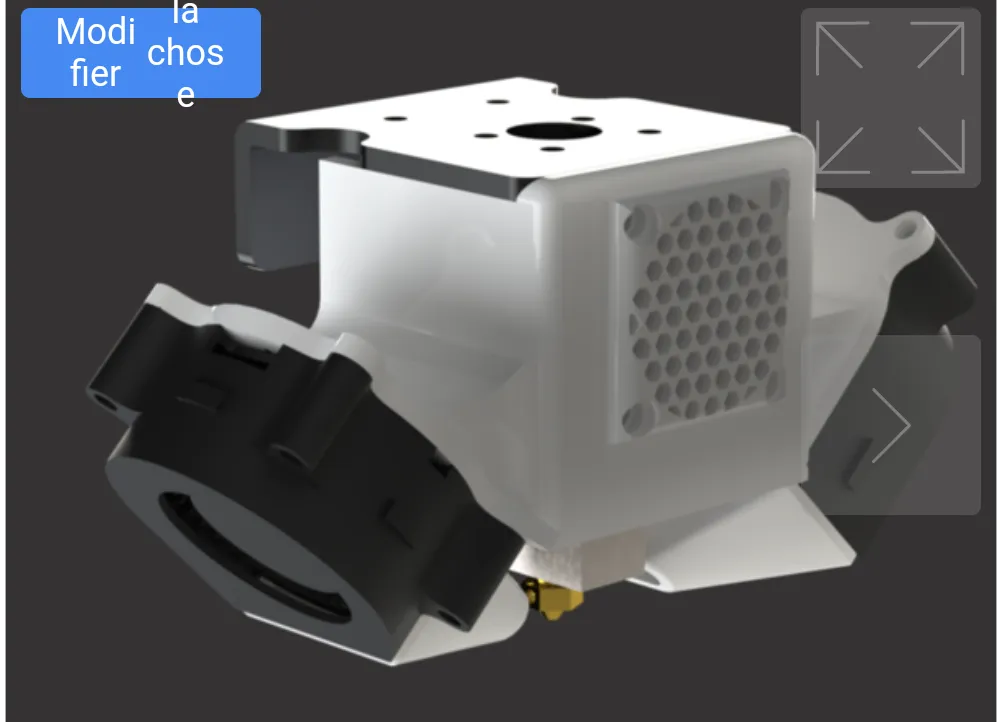
Hot End Upgrades
Upgrading the hot end is a great way to improve print quality. Consider a hot end that supports higher temperatures for printing a wider variety of filaments. All-metal hot ends are popular as they can handle higher temperatures and are more durable than the stock hot ends. Upgrading your hot end directly impacts the quality of your prints, particularly the level of detail and the ability to print with specialized materials. (Image: hot-end-upgrade.webp)
Nozzle Upgrades

Nozzles come in various sizes and materials, each affecting print quality and speed. Upgrading to a hardened steel nozzle allows you to print with abrasive filaments like carbon fiber and wood-filled filaments. You can also choose a different nozzle diameter, with smaller diameters offering higher detail and larger diameters increasing print speed. Choosing the right nozzle involves considering both the materials you plan to use and the level of detail required for your projects.
Extruder Upgrades
A reliable extruder is essential for consistent filament feeding. Upgrading to a dual-gear extruder can provide better grip and prevent filament slipping. Direct-drive extruders, where the extruder is mounted directly on the hot end, can also provide better control and improved print quality, especially for flexible filaments. Ensuring your extruder is working efficiently is crucial for achieving optimal prints and minimizing extrusion-related issues.
Bed Leveling Upgrades
Proper bed leveling is crucial for first-layer adhesion and print quality. There are two main options for bed leveling upgrades: automatic and manual. Automatic bed leveling uses a sensor to measure the distance between the nozzle and the bed at multiple points, then adjusts the Z-offset accordingly. Manual bed leveling relies on manual adjustments of the bed’s screws. Both options can greatly improve print quality. Upgrading your bed-leveling system can streamline the printing process and reduce the frustration of dealing with poor bed adhesion. (Image: automatic-bed-leveling.webp)
Automatic Bed Leveling

Automatic bed leveling (ABL) systems use a sensor to map the bed and automatically adjust the nozzle height. This eliminates the need for manual leveling, saving time and improving print consistency. Popular ABL options include inductive sensors, capacitive sensors, and BLTouch sensors. ABL systems can make the printing process much easier. Consider the cost and ease of installation when choosing an ABL system.
Manual Bed Leveling
Manual bed leveling involves adjusting the bed’s screws until the nozzle is the correct distance from the bed. While it requires more hands-on effort, it is often a less expensive upgrade option. It’s essential to ensure the bed is level for a successful print. Upgrading your bed leveling system can ensure consistent results and reduce potential issues like warping or poor adhesion.
Electronics Upgrades
Upgrading the electronics of your Tevo Tarantula Pro can significantly improve its performance and reliability. These upgrades can also provide advanced features and support for future enhancements. Replacing the stock components with more modern and capable alternatives can lead to more accurate, reliable, and user-friendly printing. Electronics upgrades are a fundamental part of optimizing your printer for the best possible results.
Motherboard Upgrades

A new motherboard provides more processing power and advanced features. Consider a board that supports features like silent stepper motor drivers and offers improved print quality. A new motherboard can also accommodate more advanced firmware options and enable future upgrades. Consider a board with more advanced features, such as silent stepper motor drivers, for quieter operation. Upgrading the motherboard is one of the most impactful upgrades you can perform. (Image: motherboard-upgrade.webp)
Stepper Motor Driver Upgrades
Stepper motor drivers control the movement of your printer’s motors. Upgrading to silent drivers significantly reduces the noise generated by the printer. These drivers also often provide more precise control, leading to smoother movements and higher-quality prints. Silent drivers are especially beneficial for those printing in a shared living space or a quiet environment. This upgrade enhances user experience and reduces printer noise.
Firmware Upgrades
Updating the firmware on your Tevo Tarantula Pro can unlock new features, improve print performance, and fix bugs. Marlin firmware is a popular choice and offers many customization options. Be sure to back up your existing firmware before making changes. Firmware upgrades are crucial for accessing the latest features and optimizations available for your 3D printer. They enhance the printer’s capabilities and address any potential issues.
Upgrading Your Tevo Tarantula Pro Kit
Once you’ve selected your upgrades, it’s time to install them. Always follow the manufacturer’s instructions carefully. A methodical and well-planned approach will help ensure a successful upgrade. Taking your time and paying close attention to detail is crucial for achieving the best results. This step-by-step guide provides general advice, but it’s important to consult the specific instructions provided with your chosen upgrade kit. Remember to stay organized, work in a well-lit space, and take your time to avoid mistakes.
Step-by-Step Guide to Upgrading
Installing an upgrade involves several steps, from disassembling the printer to reassembling it with the new components. Each upgrade will have its own set of instructions, so always consult the documentation provided with your specific kit. However, these general guidelines can provide a useful framework. Remember to unplug your printer before starting any electrical work and always prioritize safety. Keep your workspace organized and take photos of the process to help you remember how everything goes back together.
Tools and Materials Required
Gather the necessary tools and materials before you begin. This typically includes Allen wrenches, screwdrivers, pliers, and a multimeter. It’s always a good idea to have extra zip ties, electrical tape, and other common supplies on hand. Preparing your workspace with the right tools will make the upgrade process more efficient and reduce the chances of running into unexpected roadblocks. Always ensure you have the appropriate tools for the specific upgrades you are installing.
Disassembly
Carefully disassemble the parts that need to be upgraded. Take pictures or videos of the process to help you remember how the components are connected. Disconnect any wires, remove screws, and detach the old components. Organizing the removed parts and labeling them can also make the reassembly process easier. Disassembly is crucial for removing old parts to make way for the new and improved components. When disconnecting any wires, take care and follow the manufacturer’s instructions carefully to avoid damaging the components. (Image: disassembly.webp)
Assembly
Install the new upgrade components according to the manufacturer’s instructions. Reconnect any wires, attach screws, and secure the new parts in place. Double-check all connections to ensure they are secure and properly aligned. Assembly is where you bring your new upgrades to life. Follow the step-by-step instructions and take the time to ensure all connections are secure and correctly placed. If you have any doubts, consult the upgrade’s manual or seek help from online resources.
Calibration and Testing
After installing the upgrades, calibrate the printer and test it to ensure that everything functions correctly. This may involve adjusting the bed level, calibrating the extruder steps, and performing a test print. Calibration is essential for ensuring optimal performance. After assembling your upgraded components, follow the instructions to calibrate the printer, and then initiate a test print to evaluate how your upgrade has improved the printer’s output. This last step is vital for verifying the success of your upgrade. (Image: calibration-testing.webp)
Troubleshooting Common Upgrade Issues
Even with careful planning, you might encounter issues during or after the upgrade process. Troubleshooting can be a learning experience, and many problems have simple solutions. Being prepared to diagnose and solve common problems will save you time and frustration. Online resources and community forums are excellent places to find solutions. You can also contact the manufacturer or the vendor of your upgrade for assistance.
Print Quality Problems
Poor print quality can often be traced back to issues with calibration, temperature settings, or bed leveling. If you’re seeing problems, double-check these settings first. Adjusting these settings can significantly improve the quality of your prints. Over or underextrusion can also affect print quality. Check the extruder calibration, adjust the flow rate, and consult online forums for troubleshooting tips.
Connectivity Issues
Connectivity issues can arise after electronics upgrades. Ensure all wires are connected securely and that your firmware is compatible with the new components. Checking the power supply and ensuring it provides enough power can resolve many of these issues. Re-flashing the firmware might be needed. If the firmware isn’t compatible with the new motherboard, flashing a version that matches the board’s specifications should resolve the issue. Additionally, confirm that all USB connections are secure.
Maintenance and Further Upgrades
Maintaining your upgraded Tevo Tarantula Pro and planning for future upgrades will ensure its longevity and continuous improvement. Regular maintenance, such as cleaning and lubricating components, is essential. Researching new upgrades and staying informed about industry advancements can keep your printer at the forefront of 3D printing technology. Regularly scheduled upkeep will also extend the life of your components. (Image: regular-maintenance.webp)
Regular Maintenance
Regular maintenance, such as cleaning the nozzle and lubricating the moving parts, is essential for optimal performance. Check and tighten belts, and inspect the hot end and other components regularly. Performing these checks can prevent many common issues. This ensures your printer operates smoothly and prevents potential damage. Also, keeping your printer clean by dusting it off can prevent a build-up of dirt that might interfere with printing.
Future Upgrade Considerations
Consider future upgrades based on your printing needs. Research the latest advancements in 3D printing technology, such as new filament types, improved print beds, and enhanced electronics. Researching new materials and methods can expand your printing capabilities. Staying informed about advancements allows you to make informed decisions about which upgrades will benefit your workflow. Keep learning and refining your skills as the technology evolves to make the most of your upgraded printer.
Conclusion
Upgrading your Tevo Tarantula Pro can transform your 3D printing experience, offering improved print quality, speed, and reliability. By carefully selecting upgrades, following the installation steps, and performing regular maintenance, you can maximize the capabilities of your printer. Embrace the opportunities for learning and growth that come with the upgrade process, and enjoy the enhanced results and printing projects that come with an upgraded machine. This guide has provided a comprehensive overview of the upgrade process. Enjoy your enhanced 3D printing experience!